So for those girls out there that love nail polishes as much as I do, you know it's a dream to own one of those acrylic nail polish racks that hold something like 96 or 102 nail polishes, you mount it on the wall and you have all your lovely polishes on display.
For some reason just the thought of it make me giddy. I've seen this rack several time on amazon.com and something "similar" and waaaay smaller on amazon.co.uk which is frustrating enough as it is.
But OH! I have an APO box fortunately, and most people ship to APO because in reality they're only shipping as far as NJ after that the MPS takes care of the package.
Here comes the fun part...
I've had to purchase it twice! The first time the seller eCompleteStore, everything seemed to be going fine, my card was charged, 3 days later... the seller cancelled because they were having "shipping issues". I thought "OK, sometimes people can't ship to APO or prefer not to because it's a bit of a hassle". I waited until I got refunded to repurchase from someone else, I really should've taken that as a sign.
This time I clicked buy from the IDEAS store on amazon.com as-well, it was a little more expensive due to shipping but still only 40 something dollars. Days went by, hmm still no shipping confirmation? I get an email the next day "Cancelled due to customer exchange"... I went ballistic. I immediately went to their store front and double checked; they shipped to APO, oh but look... they changed their mind. The exact same product $84 plus shipping.
Obviously I was more upset over the second time I tried to buy this darn rack than the first time because not only did the seller cancel and say I was the one who changed her mind but also the ridiculous new price tag! (For those wondering here is the link to the store front of this fairly unprofessional company.
However, Amazon's customer service was AMAZING, guess they felt bad for me and gave me a $5 gift card and I didn't even rant. In my email to Amazon I only explained what the original price was, that I was accused of cancelling the order, and that I understood that they could've made the mistake of putting in the wrong price for this article but they could have at least informed me of this mistake instead of using me as an excuse and I highly recommend they notify the seller that it was inappropriate.
I cannot believe my inner Latina didn't go full explosion on this guy... maybe that's just me growing older and wiser :P
Anyway! This is the beauty I've been trying to get a hold of :(
Nail Polish Rack
I shall have to build my own!!!
Wish me luck.
Showing posts with label China Glaze. Show all posts
Showing posts with label China Glaze. Show all posts
Friday, February 21, 2014
Monday, January 27, 2014
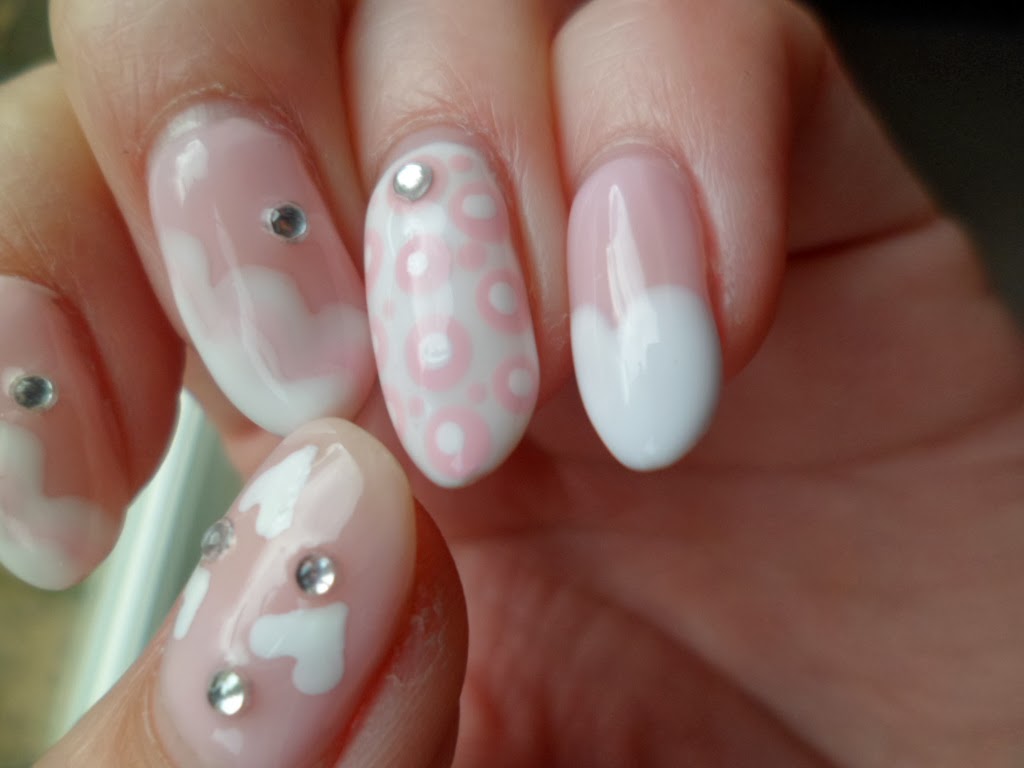
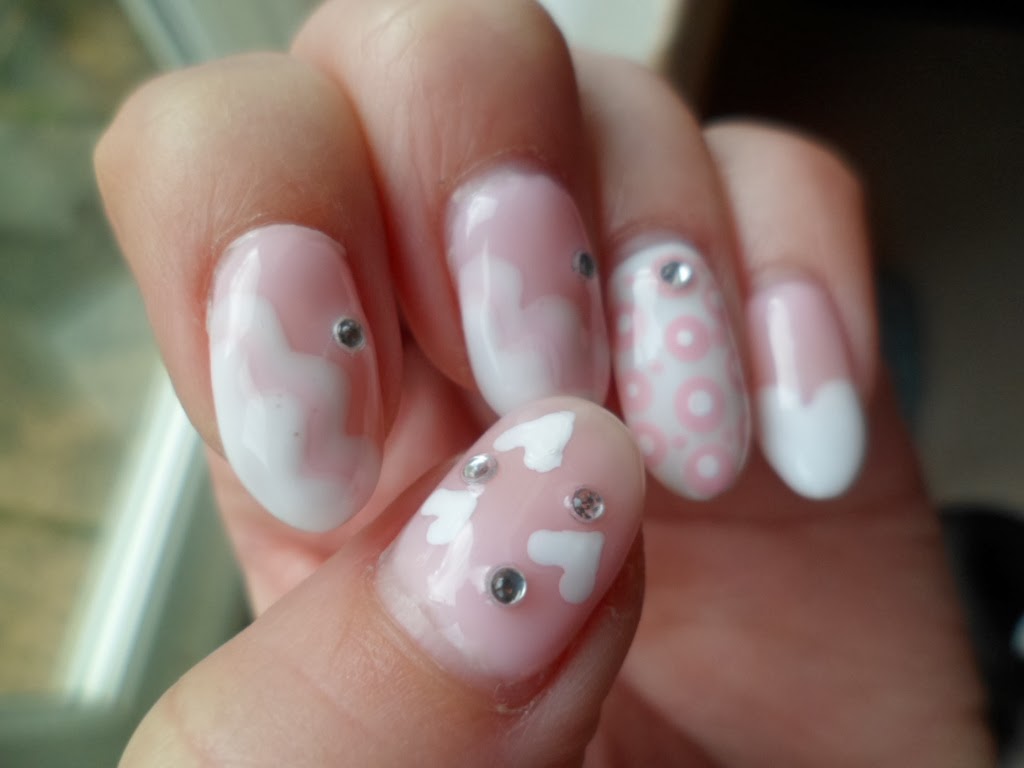
Pre-Valentine's Valentine's Manicure
So I had originally filmed a video for this design but oh surprise! Twas horrible and I was unprepared and nervous and ended up staining my bed with nail polish LOL!
But anywho! Attached are the pictures of the end result and listed and linked are the products I used and at the end I linked the manis that inspired me to do this design :)
Hope you like it!
The pinky heart was inspired by NailArtista, the 3 layered fluffy nail was inspired by a pic I found on Google last week but I can't find it anymore to give the artist their credit so if someone finds it please be kind enough to let me know in the comments! The polka dots and hearts were just random because I had no idea what to do on those 2 fingers.
So the products used were:
Bluesky Gel Polish in Romantique
Bluesky Gel Polish in Studio White
Gelish Top & Base Coat
A UV lamp I got ages ago can't find the link
Dotting Tools
China Glaze Something Sweet
Barry M Polish in Pink Silver Glitter
And any simple white nail polish for dots here and there
So for those who are familiar with the whole Shellacs process you know how it works, and for those who don't; I give a brief explanation here on one of my previous posts.
I hope you liked the mani, it's really cute and very "ad hoc" with the love birdy season :)
But anywho! Attached are the pictures of the end result and listed and linked are the products I used and at the end I linked the manis that inspired me to do this design :)
Hope you like it!
 |
| My fav was the pinky |
 |
| Soooo cute! |
 |
| Ignore my horrible cuticle, I've been anxious nibbling my thumb :P |
So the products used were:
Bluesky Gel Polish in Romantique
Bluesky Gel Polish in Studio White
Gelish Top & Base Coat
A UV lamp I got ages ago can't find the link
Dotting Tools
China Glaze Something Sweet
Barry M Polish in Pink Silver Glitter
And any simple white nail polish for dots here and there
So for those who are familiar with the whole Shellacs process you know how it works, and for those who don't; I give a brief explanation here on one of my previous posts.
I hope you liked the mani, it's really cute and very "ad hoc" with the love birdy season :)
Monday, January 13, 2014
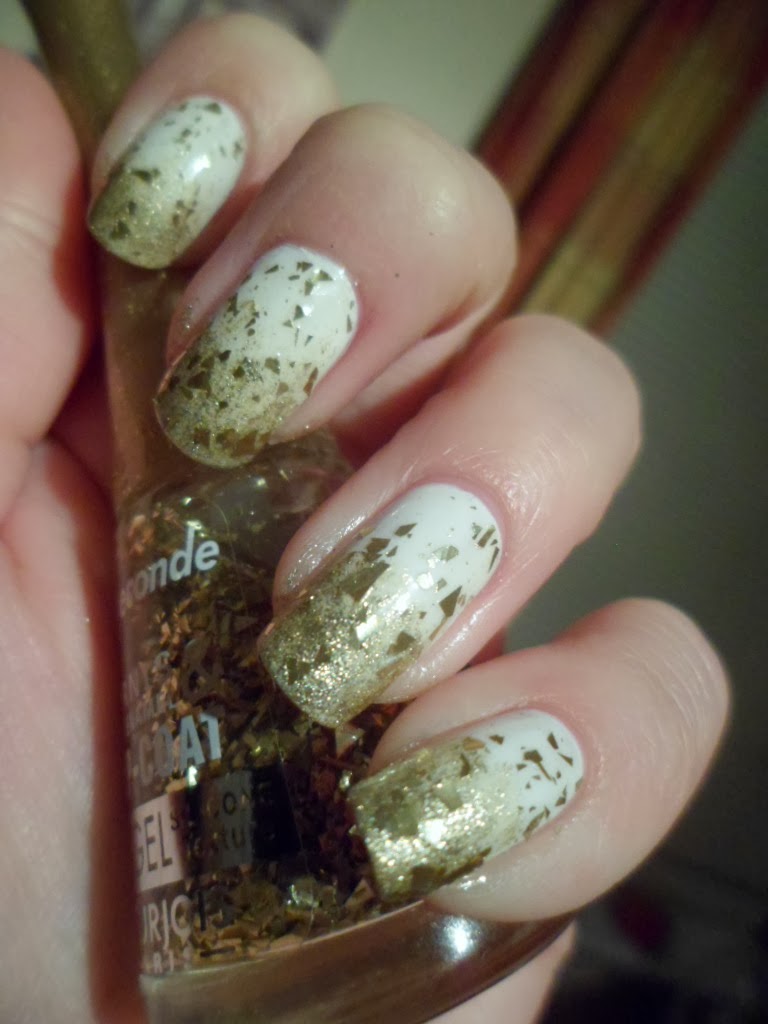
Golddigger Manicure
Boring Monday afternoon, the BF playing some Assassin's Creed IV and I just had pasta for dinner. I don't want to move but I look at my tattered hands (more like my chipped away mani) and gather the strength to go up to the 3rd floor bathroom... where I have all my nail polishes. I hate myself for putting them soooo far away.
What shall I do? Glitter? Matte grey? Something neutral? Or should I just leave them natural for a while? ....hah! Yeah, sure.
Oh hey, I haven't actually ever tried anything with white nail polish aside from that Ruffian Manicure I did on my mom for Christmas. Let's see what crazy idea I can come um with...
 |
| A couple of coats of white later |
So the white looked very purtty on it's own but a little too "blah" for someone who's trying to build up a reputation in the nail industry. So I went upstairs... again! This time I grabbed one of those eye-shadow applicators my mom got me for this sort of thing (she know I use brushes not applicators for my actual makeup). I decided to try a gold ombre with Revlon's Gold Coin which is a lovely gold color and currently one of my favorites. I began to dab away.
The results; better than I expected. Lets add a top coat, but why any top coat? I went for Bourjois Vampire Vanity with gold specks in it!
I actually think it looked more chic without the specks but I was not willing to go upstairs again to get a different top coat LOL! It's Monday! Cut me a break :P
Friday, January 10, 2014
O.P.I. Euro Centrale Review
I have to say, I want them all!
I got a couple of them for Christmas. The formula goes on so beautifully, even and smooth. As you might have noticed from my polish collection I have a soft spot in my heart for blue hues and the Euro Centrale line has several blues :D (happy girl over here!)
The line is innovative, bold, versatile, I can't say enough positive things about this line and I haven't even swatched half of them!
Given the sad mani I had yesterday that chipped away like an iceberg, I came home from work today straight to the nail polish drawer and pulled out Eurso Euro and Polka.com and hands to the task of making my nails look fab.


So, are you ready to be awed? This is what Eurso Euro looks like after 2 coats (hardly necessary to apply 2 coats, it goes on very opaque)
 |
| I love how it looks! |
Oh that's not all! I loved Polka.com since the moment I laid eyes on it, it's a little tricky (as most sequin glitter polishes are) I did have to go over my nails about 3 times before I got the results I wanted but boy was it worth it. The specs compliment the colours in this line so wonderfully.
 |
| After one coat of Polka.com |
 |
| After 3 coats of Polka.com |
I highly recommend this line to anyone, the formula of all the Euro Centrale polishes I have tried is amazing.
P.S. Please don't mind my uneven, crappy looking hands and finger nails, I haven't gotten a proper manicure in a while now and I keep breaking my nails :(
Butter London The Black Knight Review
I am a big fan of Butter London nail polishes, their colours are so unique and beautiful.
Sadly I am a little disappointed with The Black Knight, the formula is a little gloopy and you definitely need 2 coats to get the results you're looking for AND it chipped off so fast!
I did my nails yesterday evening and today before noon... well as you can see, my left hand looks just fine but the right hand has already began to chip away.
You must be thinking "Well, what about your top coat?" Yes, I did apply a top coat. The next thought that comes to mind is "Is this polish really worth it's price?" Maybe not this colour specifically, but I think maybe, just maybe if you use this polish in a "jelly Sandwich" it might actually work great.
Jelly sandwiches work great with regular nail polishes with high glitter content because glitter polishes dry a lot faster than regular ones.
Apply a thin layer of gel soak off base coat and cure it for 120 seconds, wipe off the stickiness with a lint free cotton pad and apply your polish, let it dry as you would normal nail polish, wait an hour or two and then apply your gel soak off top coat and cure for 2 minutes and TADA!!!!
This should help these kind of "chippy" nail polishes stay on for a bit longer. I haven't done it with this polish specifically but I have done it with others and it's worked wonders.
Don't give up on that beautiful polish you fell in love with JUST because it chips off so fast, there are ways to make it last :)
Sadly I am a little disappointed with The Black Knight, the formula is a little gloopy and you definitely need 2 coats to get the results you're looking for AND it chipped off so fast!
I did my nails yesterday evening and today before noon... well as you can see, my left hand looks just fine but the right hand has already began to chip away.
 |
| So sad it chipped in less than a day |
 |
| Left hand intact, chipped 3 hours later... |
You must be thinking "Well, what about your top coat?" Yes, I did apply a top coat. The next thought that comes to mind is "Is this polish really worth it's price?" Maybe not this colour specifically, but I think maybe, just maybe if you use this polish in a "jelly Sandwich" it might actually work great.
Jelly sandwiches work great with regular nail polishes with high glitter content because glitter polishes dry a lot faster than regular ones.
Apply a thin layer of gel soak off base coat and cure it for 120 seconds, wipe off the stickiness with a lint free cotton pad and apply your polish, let it dry as you would normal nail polish, wait an hour or two and then apply your gel soak off top coat and cure for 2 minutes and TADA!!!!
This should help these kind of "chippy" nail polishes stay on for a bit longer. I haven't done it with this polish specifically but I have done it with others and it's worked wonders.
Don't give up on that beautiful polish you fell in love with JUST because it chips off so fast, there are ways to make it last :)
Thursday, January 9, 2014
My Nail Polish Collection
As most of my friend know, I do love my nail polishes, my mother gifted me about 15 on Christmas which I LOVED! My humble collection used to be a lot larger before I moved to the UK, sadly I had to down size when I moved.
I also have to admit that if I don't feel a colour looks good on me because of my skin tone I almost immediately give it away, or if I feel a polish is getting too old I toss it in the bin.
So here they are, my 'lil gems :)

All in this photo are Revlon nail polishes.


All by Sally Hansen, starting left to right: Hard to Get, Firm Fig, Heart of Stone, Unbreakable Heart, Mighty Mango, Die-Hard Fan, Tough Chick, Green With Envy, Deep Purple, Blue Me Away, Lacey Lilac, Sun Kissed, Cherry Red, Jaded, Water Color, Ink Splatter (Crackle), Coral Collide (Crackle), Fractured Foil (Crackle), & Fuzzy Fantasy (Fuzzy Coat).


Mix and Match my randoms: Bourjois Vampire Vanity, Gosh's Frosted Purple, Rimmel's Ruby Crush, Claire's Little Peacock, Claire's Teal, Rimmel's Ultra Shine Top Coat, Butter London's Bluey, Butter London's The Black Knight, Color Club Neon Green (that's not the actual name, apparently I peeled off the name label LOL), Essie's Power Clutch, Tangerine Crush by L'Oreal, New Money by L'Oreal, & Diamond Carat Top Coat by L'Oreal (my favorite top coat!).


 These I had to Google because the bottle only had the number on it: Covergirl's 315 Timeless Rubies, 125 Peaches & Cream, 110 Snow Storm, Barry M's Diamond Glitter & Duchess, and the white, silver, & black nail art kit by Kiss.


Mix and Match my randoms: Bourjois Vampire Vanity, Gosh's Frosted Purple, Rimmel's Ruby Crush, Claire's Little Peacock, Claire's Teal, Rimmel's Ultra Shine Top Coat, Butter London's Bluey, Butter London's The Black Knight, Color Club Neon Green (that's not the actual name, apparently I peeled off the name label LOL), Essie's Power Clutch, Tangerine Crush by L'Oreal, New Money by L'Oreal, & Diamond Carat Top Coat by L'Oreal (my favorite top coat!).
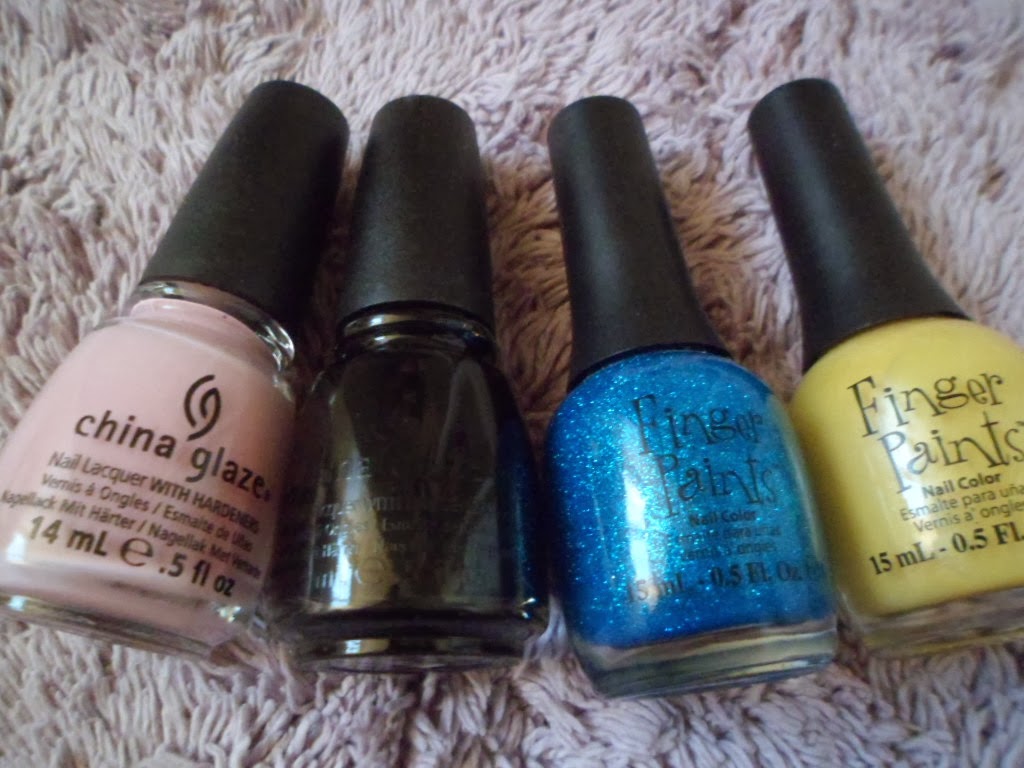
Starting with pink: Something Sweet by China Glaze, Liquid Leather by China Glaze, Laugh My Art Off by Finger Paints, Art Nouv-Yellow by Finger Paints, OPI's Polka.com (I freaking love this one!), OPI's I Saw... U Saw... We Saw... Warsaw, OPI's Eurso Euro, & Cinderella by SinfulColors.
Hope you enjoyed as much as I did :P
On a side-note; I also have Gel polishes, many gel polishes. As you mau know, these don't come in see through bottles and some names are just numbers. So I didn't even bother in listing them here.
Although I can promise you another post with all the gel polishes with swatches!
Monday, January 6, 2014
Half Moon Manicure
A friend of mine booked me to do her Shellacs after work today and she bought these 2 very pretty Bluesky in CS60 and Mocha VIP which look very cute together. As I was doing her nails she had to remind me several times to take pictures for me to document it yet I failed to do so on occasions.
So this mani was a last minute improvisation because we weren't sure what design we wanted on the nails, but it turned out very lovely in the end. Inspired by the 30's era I went for the Half Moon Manicure with a couple of rhinestones here and there.
 Step 1
Start with clean dry nails and apply your base coat and cure each hand in a UV lamp for 2 mins (30 seconds if it's an LED lamp), in today's case I'm using all Gel Polishes and so far my favorite base and top coat are Harmony's Gelish Soak Off. In the UK you can purchase on Amazon here for about £20 and in the US here for $22 including shipping.
 Step 2
My friend wanted her thumb and ring finger in the nude pink tone with the rhinestones and the rest in the Mocha VIP. Again cure each hand for 2 mins under the UV lamp and proceed to apply a second coat if necessary (depends on the opacity of the polish).
Cure once more.
 Step 3
It's time to do the half moon. Normally this is where you get some reinforcement stickers and put them at the top of your nail to create the perfect crescent shape but I like to keep things interesting and forget to bring handy things like that (perfect cover up LOL) so I had to free handed it. I put a generous drop on the opposite colour at the base of the nail bed and moved it around with my dotting tool until I created the shape I wanted and cured once more for a minute or so.
Step 4
Glitz and Glam it up! This is where you add the rhinestones and top coat these babies :)
Not sure if this was helpful at all LOL (baby steps). Let me know any feedback, email me, what would YOU my lovelies like to read about on this beauty blog?
I'm open for suggestions :)
So this mani was a last minute improvisation because we weren't sure what design we wanted on the nails, but it turned out very lovely in the end. Inspired by the 30's era I went for the Half Moon Manicure with a couple of rhinestones here and there.
Start with clean dry nails and apply your base coat and cure each hand in a UV lamp for 2 mins (30 seconds if it's an LED lamp), in today's case I'm using all Gel Polishes and so far my favorite base and top coat are Harmony's Gelish Soak Off. In the UK you can purchase on Amazon here for about £20 and in the US here for $22 including shipping.
My friend wanted her thumb and ring finger in the nude pink tone with the rhinestones and the rest in the Mocha VIP. Again cure each hand for 2 mins under the UV lamp and proceed to apply a second coat if necessary (depends on the opacity of the polish).
Cure once more.
It's time to do the half moon. Normally this is where you get some reinforcement stickers and put them at the top of your nail to create the perfect crescent shape but I like to keep things interesting and forget to bring handy things like that (perfect cover up LOL) so I had to free handed it. I put a generous drop on the opposite colour at the base of the nail bed and moved it around with my dotting tool until I created the shape I wanted and cured once more for a minute or so.
Glitz and Glam it up! This is where you add the rhinestones and top coat these babies :)
 |
| Tada! Sorry about the bad pics, I've been using my phone |
I'm open for suggestions :)
Sunday, January 5, 2014
The Ruffian Manicure
I have recently taken a liking for this particular manicure, it looks very chic, sophisticated, and so incredibly versatile. It can be done with an incredible array of colours and can be personalized to suit you and your style; whether it be girly chic or sassy vamp the look you're going for.
The first time I heard the proper name of this manicure was thanks to YouTube Manicure Guru MissJenFABULOUS (her YouTube channel) and have been hooked ever since.
I began to search online where I could get the Ruffian stencils and the only places I could find them were in the US, and there are 2 things I can't purchase on that side of the world: Perfumes & Nail Polish, sadly companies (B&BW, Birchbox, Sephora, etc) cannot ship these 2 products to my APO address and shipping them to my European address would eat away at my income like I eat away at cookies. So what can a girl do? Improvise.
This is when I searched YouTube on how to do it and MissJen was amazing at explaining step by step how to do this on video. So I shall try my best to do so with pictures and a simple explanation.
 Step 1
Start off with a clean buffed nail, soak your fingers in warm soapy water to loosen your cuticle and easily push it back, alternatively Sally Hansen's Cuticle Remover works in a jiffy. Girls in the UK can buy it here at Boots, in the States you can go to your local Walmart, most of them have this product. After your nails are nice and dry apply your favorite Top Coat.

Step 2
Choose your colours and design. I'm going with gold and black, only doing my ring finger in black because I'm going over it with Bourjois Vampire Vanity which has lovely gold flakes in it, sadly it was a buy 3 get the polish free edition, I haven't found anywhere other than France to buy it online. And I just went on a tangent, sorry! Ok, the black I'm using is by China Glaze, the gold is Revlon's Gold Coin, start to paint your nail a little higher than normal (closer to the cuticle than you normally would). Don't forget to let dry between coats.
 Step 3
You're ready for the fun part. Now that your base colour is completely dry you can go is with your second colour. Place a drop of your 2nd colour a little bit lower then where you want the Ruffian to start and with the brush gently push it up to the point where you are wanting it to begin, without lifting the brush slowly move the brush as if you were painting a circle and than pull downwards on one side and then repeat on the other side, all you have to do after that is fill in the space and use your favorite top coat to top it off.
Be warned, you need a steady hand and patience (I know it's easier said than done but practice makes perfect as cliche as that sounds). It's easier to do on someone else than on yourself, I practiced on my mom before Christmas and she loved it.

The first time I heard the proper name of this manicure was thanks to YouTube Manicure Guru MissJenFABULOUS (her YouTube channel) and have been hooked ever since.
I began to search online where I could get the Ruffian stencils and the only places I could find them were in the US, and there are 2 things I can't purchase on that side of the world: Perfumes & Nail Polish, sadly companies (B&BW, Birchbox, Sephora, etc) cannot ship these 2 products to my APO address and shipping them to my European address would eat away at my income like I eat away at cookies. So what can a girl do? Improvise.
This is when I searched YouTube on how to do it and MissJen was amazing at explaining step by step how to do this on video. So I shall try my best to do so with pictures and a simple explanation.

Start off with a clean buffed nail, soak your fingers in warm soapy water to loosen your cuticle and easily push it back, alternatively Sally Hansen's Cuticle Remover works in a jiffy. Girls in the UK can buy it here at Boots, in the States you can go to your local Walmart, most of them have this product. After your nails are nice and dry apply your favorite Top Coat.

Step 2
Choose your colours and design. I'm going with gold and black, only doing my ring finger in black because I'm going over it with Bourjois Vampire Vanity which has lovely gold flakes in it, sadly it was a buy 3 get the polish free edition, I haven't found anywhere other than France to buy it online. And I just went on a tangent, sorry! Ok, the black I'm using is by China Glaze, the gold is Revlon's Gold Coin, start to paint your nail a little higher than normal (closer to the cuticle than you normally would). Don't forget to let dry between coats.

You're ready for the fun part. Now that your base colour is completely dry you can go is with your second colour. Place a drop of your 2nd colour a little bit lower then where you want the Ruffian to start and with the brush gently push it up to the point where you are wanting it to begin, without lifting the brush slowly move the brush as if you were painting a circle and than pull downwards on one side and then repeat on the other side, all you have to do after that is fill in the space and use your favorite top coat to top it off.
Be warned, you need a steady hand and patience (I know it's easier said than done but practice makes perfect as cliche as that sounds). It's easier to do on someone else than on yourself, I practiced on my mom before Christmas and she loved it.
The Products I Used
Subscribe to:
Posts (Atom)