Showing posts with label Bourjois. Show all posts

Monday, January 13, 2014

Golddigger Manicure

Boring Monday afternoon, the BF playing some Assassin's Creed IV and I just had pasta for dinner. I don't want to move but I look at my tattered hands (more like my chipped away mani) and gather the strength to go up to the 3rd floor bathroom... where I have all my nail polishes. I hate myself for putting them soooo far away.

What shall I do? Glitter? Matte grey? Something neutral? Or should I just leave them natural for a while? ....hah! Yeah, sure.

Oh hey, I haven't actually ever tried anything with white nail polish aside from that Ruffian Manicure I did on my mom for Christmas. Let's see what crazy idea I can come um with...
A couple of coats of white later

So the white looked very purtty on it's own but a little too "blah" for someone who's trying to build up a reputation in the nail industry. So I went upstairs... again! This time I grabbed one of those eye-shadow applicators my mom got me for this sort of thing (she know I use brushes not applicators for my actual makeup). I decided to try a gold ombre with Revlon's Gold Coin which is a lovely gold color and currently one of my favorites. I began to dab away.


The results; better than I expected. Lets add a top coat, but why any top coat? I went for Bourjois Vampire Vanity with gold specks in it! 


I actually think it looked more chic without the specks but I was not willing to go upstairs again to get a different top coat LOL! It's Monday! Cut me a break :P 


Thursday, January 9, 2014

My Nail Polish Collection

As most of my friend know, I do love my nail polishes, my mother gifted me about 15 on Christmas which I LOVED! My humble collection used to be a lot larger before I moved to the UK, sadly I had to down size when I moved.

I also have to admit that if I don't feel a colour looks good on me because of my skin tone I almost immediately give it away, or if I feel a polish is getting too old I toss it in the bin.

So here they are, my 'lil gems :)


Starting up top then left to right: Vintage Rose, Gold Coin, Minted, Mischievous, Midnight Affair, Quick Dry, Steel-her Heart, Matte Top Coat, Snow Bunny, Copper Penny.
All in this photo are Revlon nail polishes.


All by Sally Hansen, starting left to right: Hard to Get, Firm Fig, Heart of Stone, Unbreakable Heart, Mighty Mango, Die-Hard Fan, Tough Chick, Green With Envy, Deep Purple, Blue Me Away, Lacey Lilac, Sun Kissed, Cherry Red, Jaded, Water Color, Ink Splatter (Crackle), Coral Collide (Crackle), Fractured Foil (Crackle), & Fuzzy Fantasy (Fuzzy Coat).


Mix and Match my randoms: Bourjois Vampire Vanity, Gosh's Frosted Purple, Rimmel's Ruby Crush, Claire's Little Peacock, Claire's Teal, Rimmel's Ultra Shine Top Coat, Butter London's Bluey, Butter London's The Black Knight, Color Club Neon Green (that's not the actual name, apparently I peeled off the name label LOL), Essie's Power Clutch, Tangerine Crush by L'Oreal, New Money by L'Oreal, & Diamond Carat Top Coat by L'Oreal (my favorite top coat!).


These I had to Google because the bottle only had the number on it: Covergirl's 315 Timeless Rubies, 125 Peaches & Cream, 110 Snow Storm, Barry M's Diamond Glitter & Duchess, and the white, silver, & black nail art kit by Kiss.


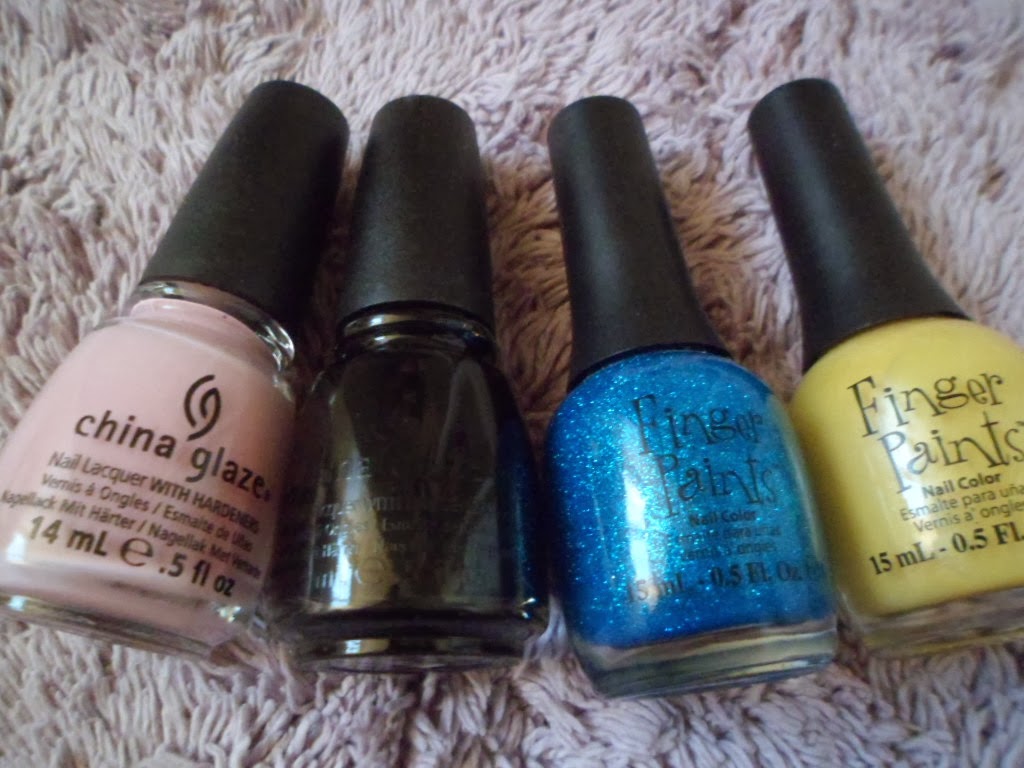
Starting with pink: Something Sweet by China Glaze, Liquid Leather by China Glaze, Laugh My Art Off by Finger Paints, Art Nouv-Yellow by Finger Paints, OPI's Polka.com (I freaking love this one!), OPI's I Saw... U Saw... We Saw... Warsaw, OPI's Eurso Euro, & Cinderella by SinfulColors.

Hope you enjoyed as much as I did :P

On a side-note; I also have Gel polishes, many gel polishes. As you mau know, these don't come in see through bottles and some names are just numbers. So I didn't even bother in listing them here.

Although I can promise you another post with all the gel polishes with swatches! 

Sunday, January 5, 2014

The Ruffian Manicure

I have recently taken a liking for this particular manicure, it looks very chic, sophisticated, and so incredibly versatile. It can be done with an incredible array of colours and can be personalized to suit you and your style; whether it be girly chic or sassy vamp the look you're going for.

The first time I heard the proper name of this manicure was thanks to YouTube Manicure Guru MissJenFABULOUS (her YouTube channel) and have been hooked ever since.

I began to search online where I could get the Ruffian stencils and the only places I could find them were in the US, and there are 2 things I can't purchase on that side of the world: Perfumes & Nail Polish, sadly companies (B&BW, Birchbox, Sephora, etc) cannot ship these 2 products to my APO address and shipping them to my European address would eat away at my income like I eat away at cookies. So what can a girl do? Improvise.

This is when I searched YouTube on how to do it and MissJen was amazing at explaining step by step how to do this on video. So I shall try my best to do so with pictures and a simple explanation.


Step 1
Start off with a clean buffed nail, soak your fingers in warm soapy water to loosen your cuticle and easily push it back, alternatively Sally Hansen's Cuticle Remover works in a jiffy. Girls in the UK can buy it here at Boots, in the States you can go to your local Walmart, most of them have this product. After your nails are nice and dry apply your favorite Top Coat.


Step 2
Choose your colours and design. I'm going with gold and black, only doing my ring finger in black because I'm going over it with Bourjois Vampire Vanity which has lovely gold flakes in it, sadly it was a buy 3 get the polish free edition, I haven't found anywhere other than France to buy it online. And I just went on a tangent, sorry! Ok, the black I'm using is by China Glaze, the gold is Revlon's Gold Coin, start to paint your nail a little higher than normal (closer to the cuticle than you normally would). Don't forget to let dry between coats.


Step 3
You're ready for the fun part. Now that your base colour is completely dry you can go is with your second colour. Place a drop of your 2nd colour a little bit lower then where you want the Ruffian to start and with the brush gently push it up to the point where you are wanting it to begin, without lifting the brush slowly move the brush as if you were painting a circle and than pull downwards on one side and then repeat on the other side, all you have to do after that is fill in the space and use your favorite top coat to top it off.


Be warned, you need a steady hand and patience (I know it's easier said than done but practice makes perfect as cliche as that sounds). It's easier to do on someone else than on yourself, I practiced on my mom before Christmas and she loved it.


The Products I Used